Hands-on Lab: Cloud Basics


Overview

This hands-on session will introduce you to OpenNebula's Cloud dashboard (Sunstone) and guides you through the process of creating and using a Virtual Machine in a basic way.

These exercises are intended to give a the ability to start using the LRZ Compute Cloud. After the lab you should be able to create and adjust VMs to your needs, install software in your VMs and being able to get your work done.

Objectives

In this hands-on lab, you will learn how to:
- log in to the LRZ Compute Cloud Dashboard,
- use the Sunstone Cloud Dashboard,
- create a virtual machine,
- connect to a virtual machine,
- change passwords for users of a VM,
- install software in a VM,
- and shut down an unused VM.
Prerequisits
The following is required to complete this hands-on lab:
- LRZ user ID assigned to a LRZ Compute Cloud project.
- A Linux/Unix workstation with a web browser. (Of course you can also use your Windows-based computer. You will find SSH commands used to connect to your VMs in the Cloud. These commands are only available on Linux/Unix machines. If you use Windows, you need to use addition tools such as PuTTY. We know that this works well, but the text of the exercises just do not cover this scenario.)
Exercises
This hands-on lab includes the following exercises:
- Exercise 1: Log in to the LRZ Compute Cloud Dashboard
- Exercise 2: Create a VM template
- Exercise 3: Create a new Virtual Machine
- Exercise 4: Connect to a running VM using SSH and change the default password
- Exercise 5: Add another network card to the VM
- Exercise 6: Install software in your virtual machine
- Exercise 7: Shut down VMs
Exercise 1: Log in to the LRZ Compute Cloud Dashboard
The LRZ Compute Cloud Dashboard is the main user interface that allows access to your resources, provides you with information necessary to operate your resources and functionality to start and stop resources or configure them the way you need.
The Dashboard can be accessed via web browser and should work with every modern browser and is accessible from anywhere on the Internet.
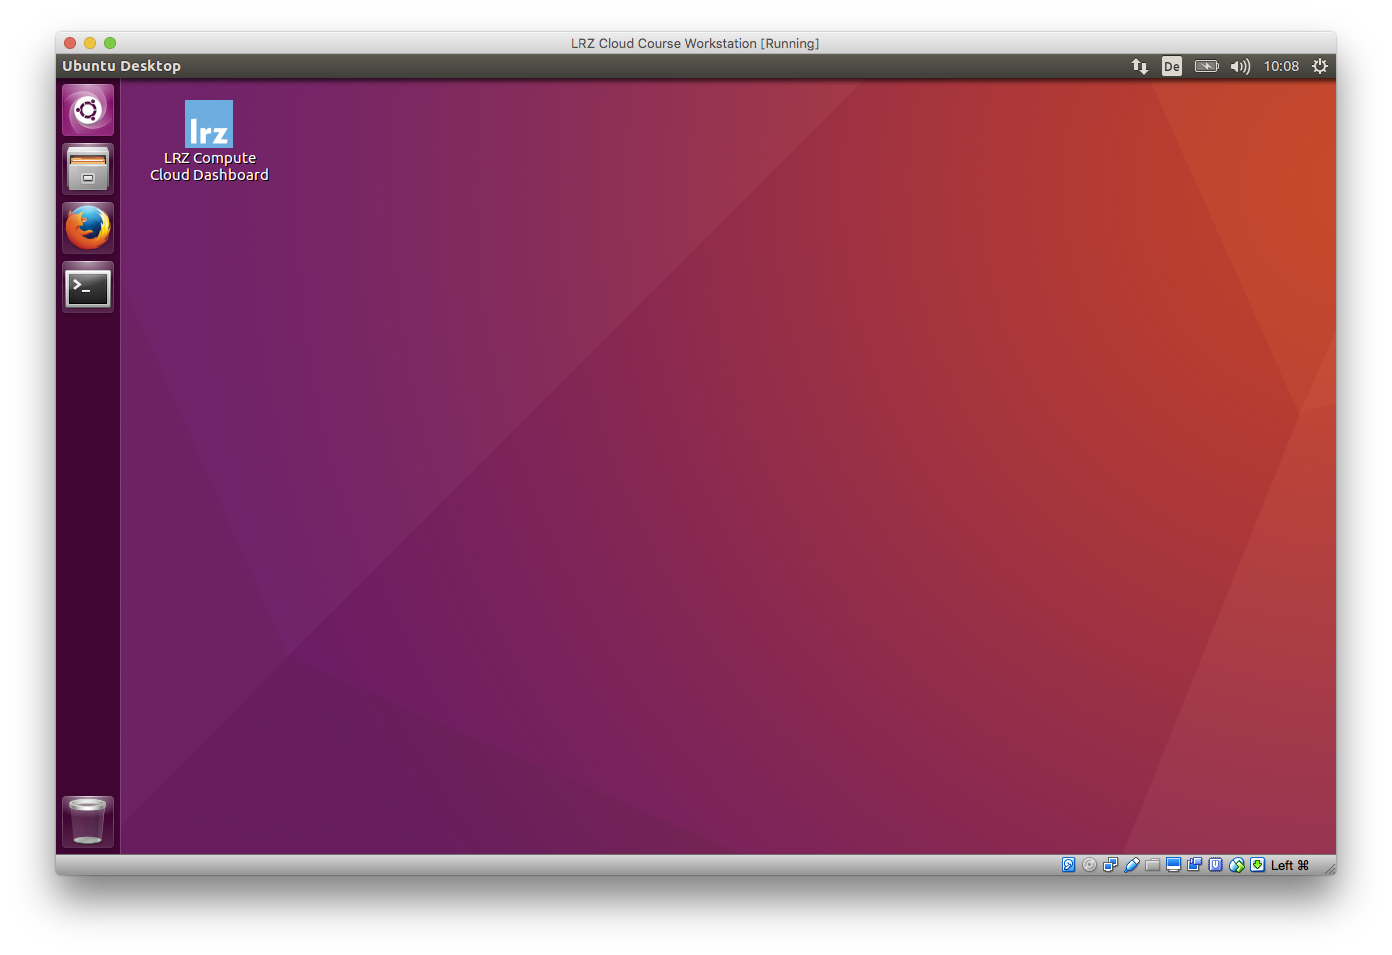
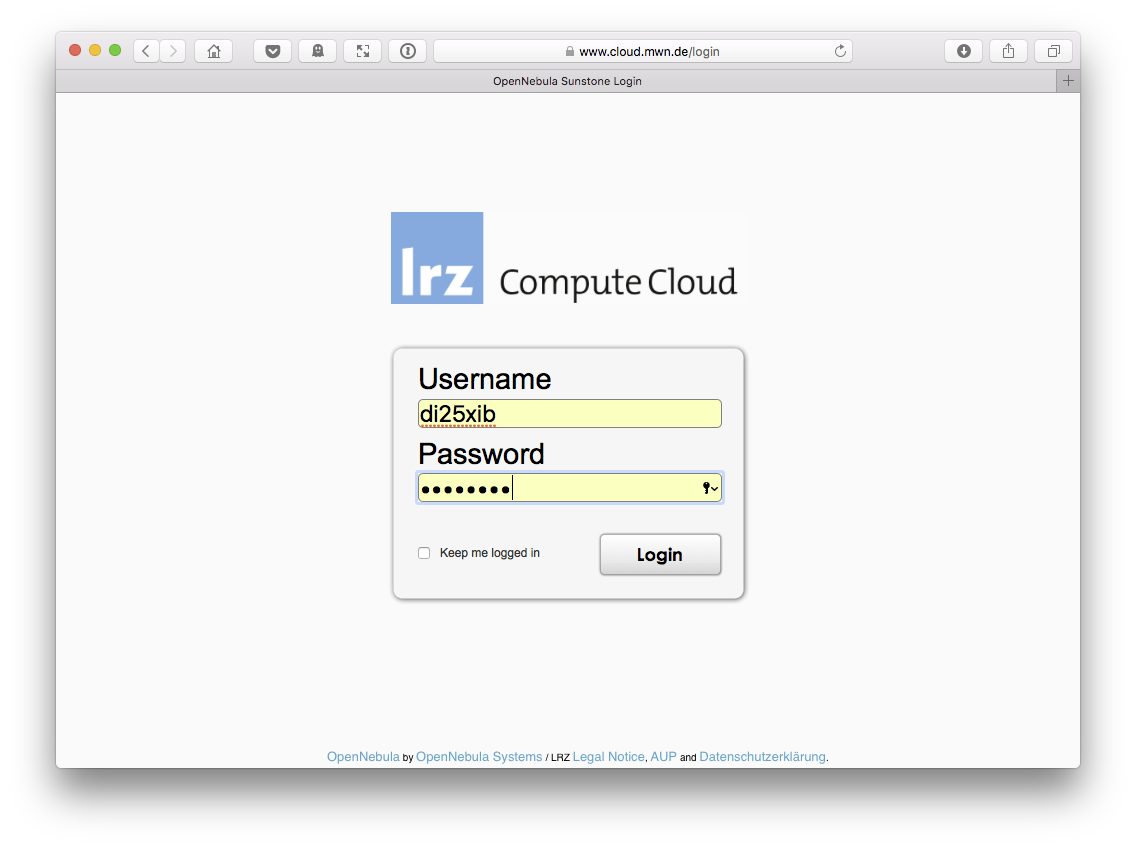
- Start the browser of your choice and visit the Cloud dashboard site at https://www.cloud.mwn.de. If you are using the VirtualBox VM prepared for this course you can find a Link on the Desktop that leads to directly to the LRZ Compute Cloud Login page.
- Log in to the portal using your username assigned to an LRZ Compute Cloud project.
- After logging in you can see an overview page showing information about your virtual resources, your current network configuration and other valuable information.
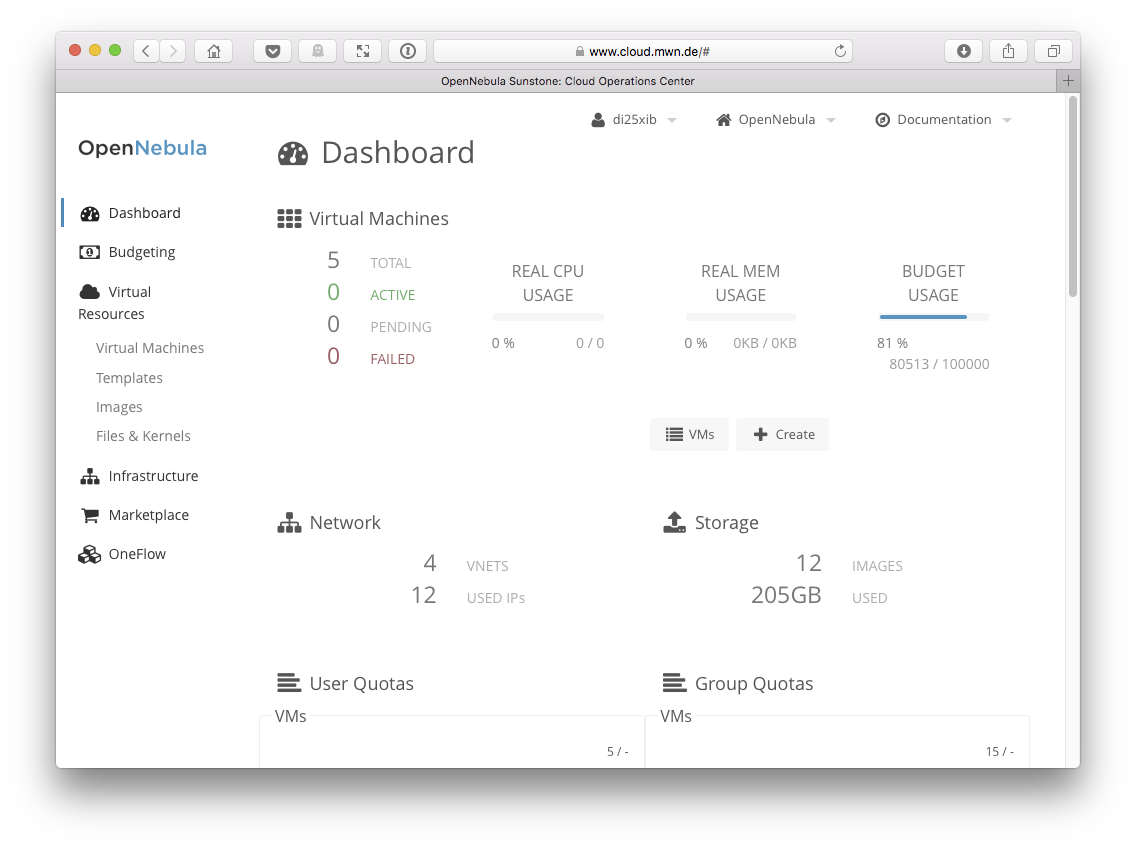
Please note that there are 2 menus that allow you access to different areas of the site. The menu on the left side of the page allows to access data belonging to your virtual machines and cloud usage while the menu on the top right allows you to access your personal settings, the OpenNebula project website and the documentation of the LRZ compute cloud.
The LRZ Compute Cloud documentation is worth a read because many problems that you can run into are already covered in the Frequently Asked Questions (FAQ) section.
From this point you can start using the LRZ Compute Cloud.
Exercise 2: Create a VM template
To get work done in the LRZ Compute Cloud you need to create VMs. VMs are the main building block of the LRZ Compute Cloud and represent the environment that is used to run your scientific calculations.
These steps are also covered and documented in our online tutorial that you can find in the online documentation.
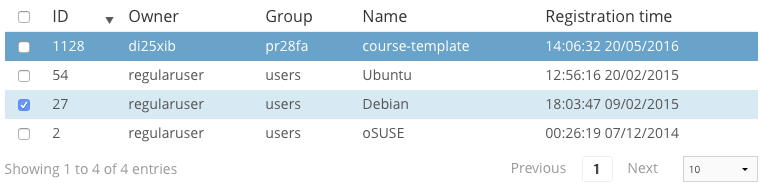
- In the left hand menu click on Virtual Resources and select Templates. You will find a list of templates that can be accessed by you.

- Click the checkbox next to the Debian template with ID 27 and click the
 in the upper site menu.
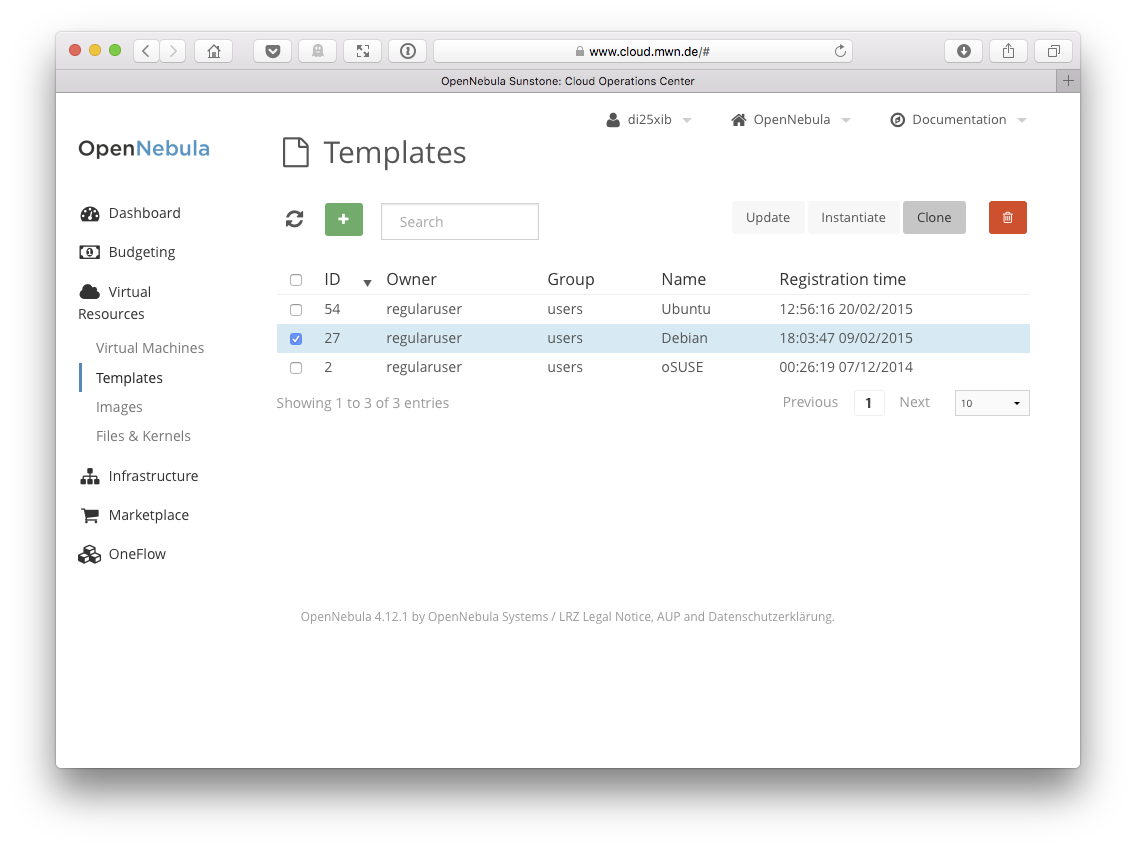
- A form will appear asking you to specify a name for the template to be created. Use
course-templateas template name and click the button.
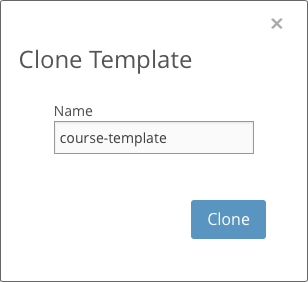
- You will be redirected to the template overview page and almost immediatly you will see the newly created template.
- Before you can use this image you need modify it's settings. Uncheck the checkbox next to the Debian template and mark the checkbox next to your newly created template. Then click the
 button in the upper menu.
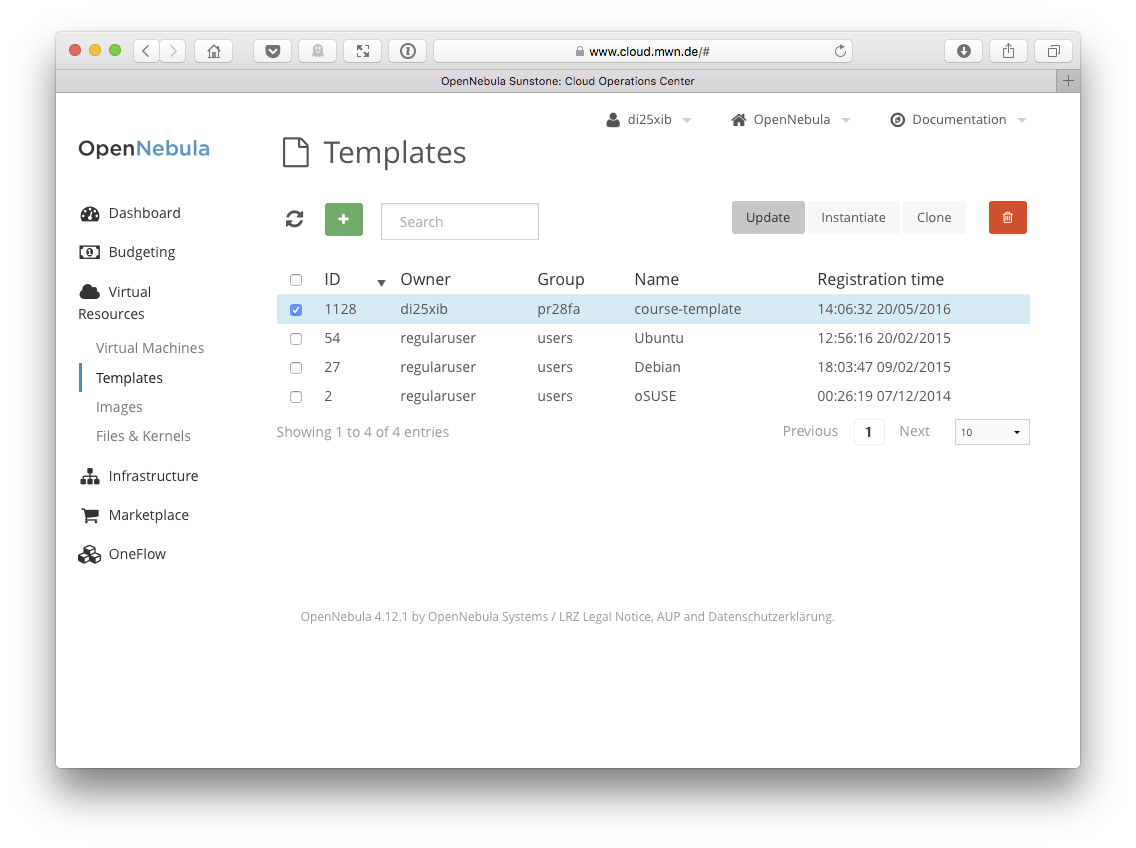
- A page will open displaying general information about the template.
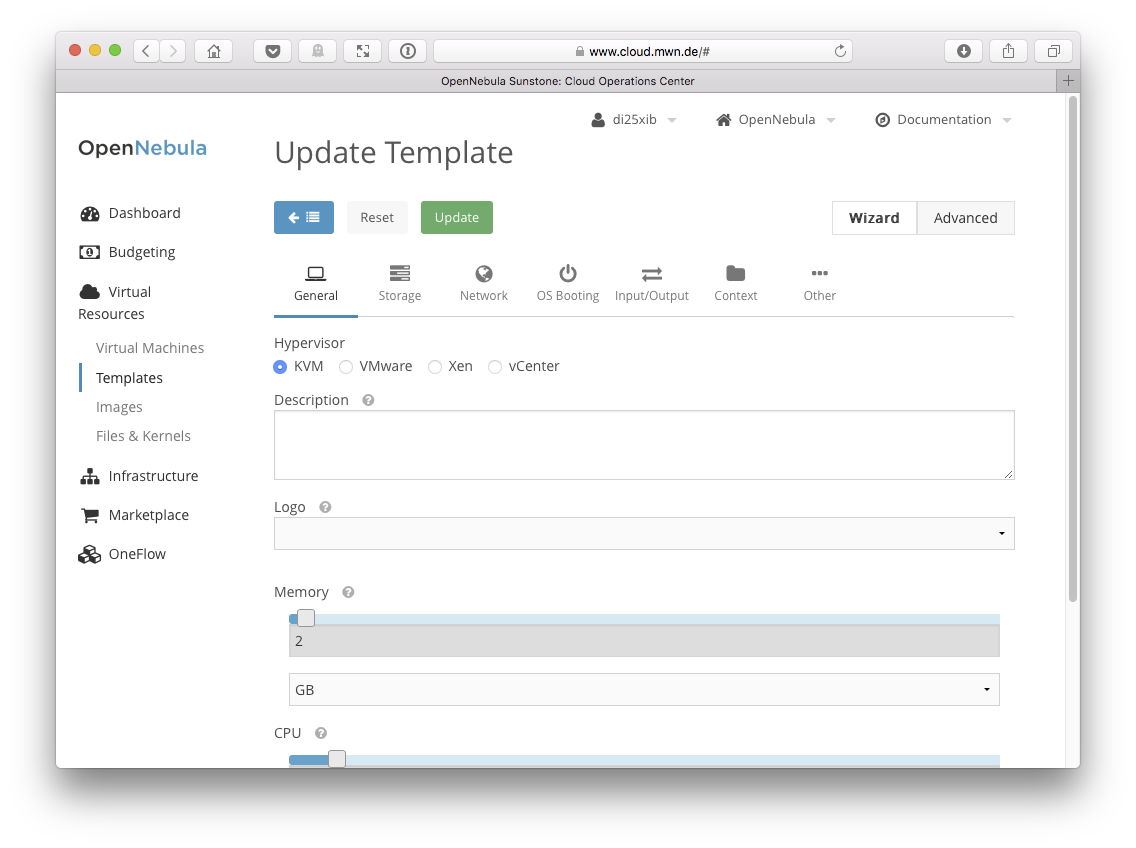
- In the upper menu, click on Network to display the network details of that image.

- To assign a network to Interface 0 (the only network interface card (NIC) attached to this machine by default) you have to select the network from the list. Choose the network
MWN_access_105(ID 11) from the list and click the button in the top menu.
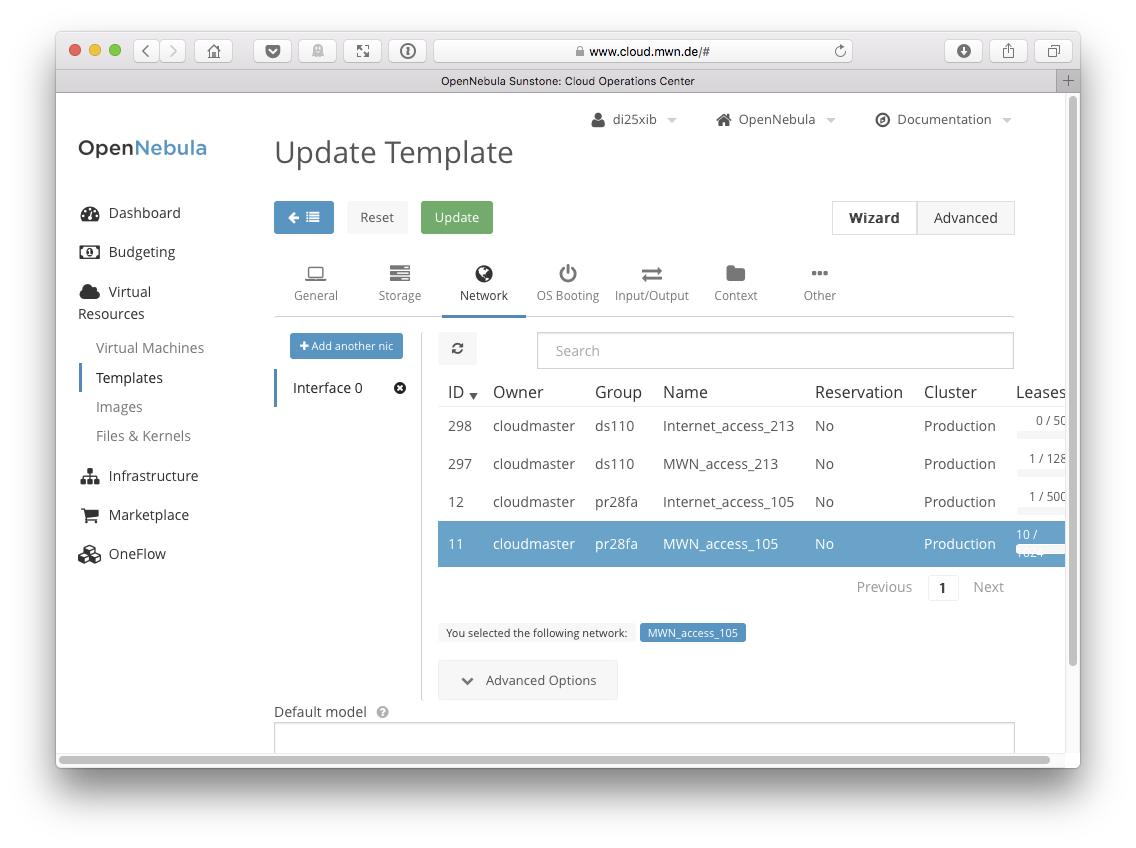
- Besides attaching a network to a NIC you need to personalize the image in order to be able to log in. In the top menu, click the Context button.

In the following form you can specify the public SSH key that should be used authenticate a user during the login process. If you do not have a SSH key pair (this is the case if you are using the VirtualBox VM we provide as working environment for this class) you first need to create such an SSH key pair. This process is shown exemplarily by using our VirtualBox VM but can be applied to every UNIX-based system like Mac OS X or your own Linux operating system. The following steps are only necessary if you do not already have a SSH key pair or if you want to create a seperate key pair to use for the Cloud.
- From the side menu, klick the
 terminal icon to start a new terminal.
- In the terminal, execute
ssh-keygento create a new SSH key pair. You can specify the file to which the key is saved (filenamewill hold the private key,filename.pubwill hold the public one) and to give a passphrase to use this key. For this course, just press<ENTER>to use the default key name and do not use a passphrase. (If you already have an existing SSH key pair you can specify another file name or use your existing one.) After the key creation process a randomart image is presented that shows a visual representation of the key's fingerprint.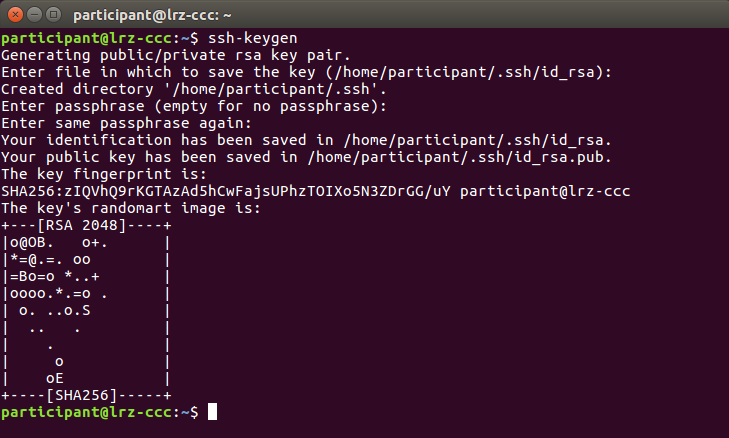
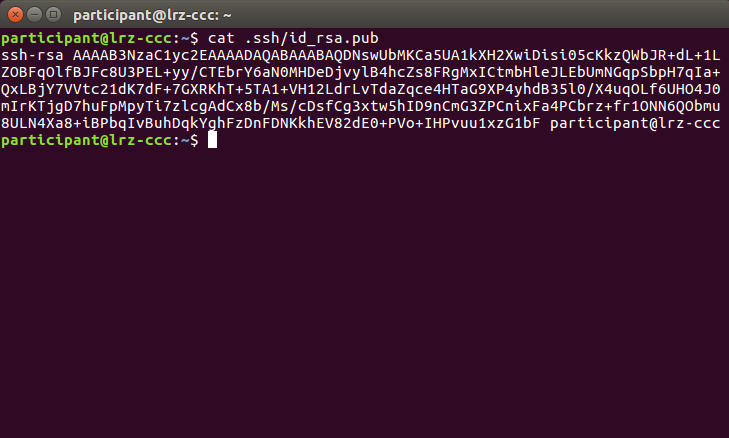
- Get the contents of the public (!) part of the newly created key by typing
cat .ssh/id_rsa.pubin the terminal. Adjust this command if your key is stored in a different file. Copy the contents of the file in your clipboard.
- From the side menu, klick the
Back in your browser, paste the public key to the Public Key: text field and make sure that the Add SSH contextualization checkbox is marked.
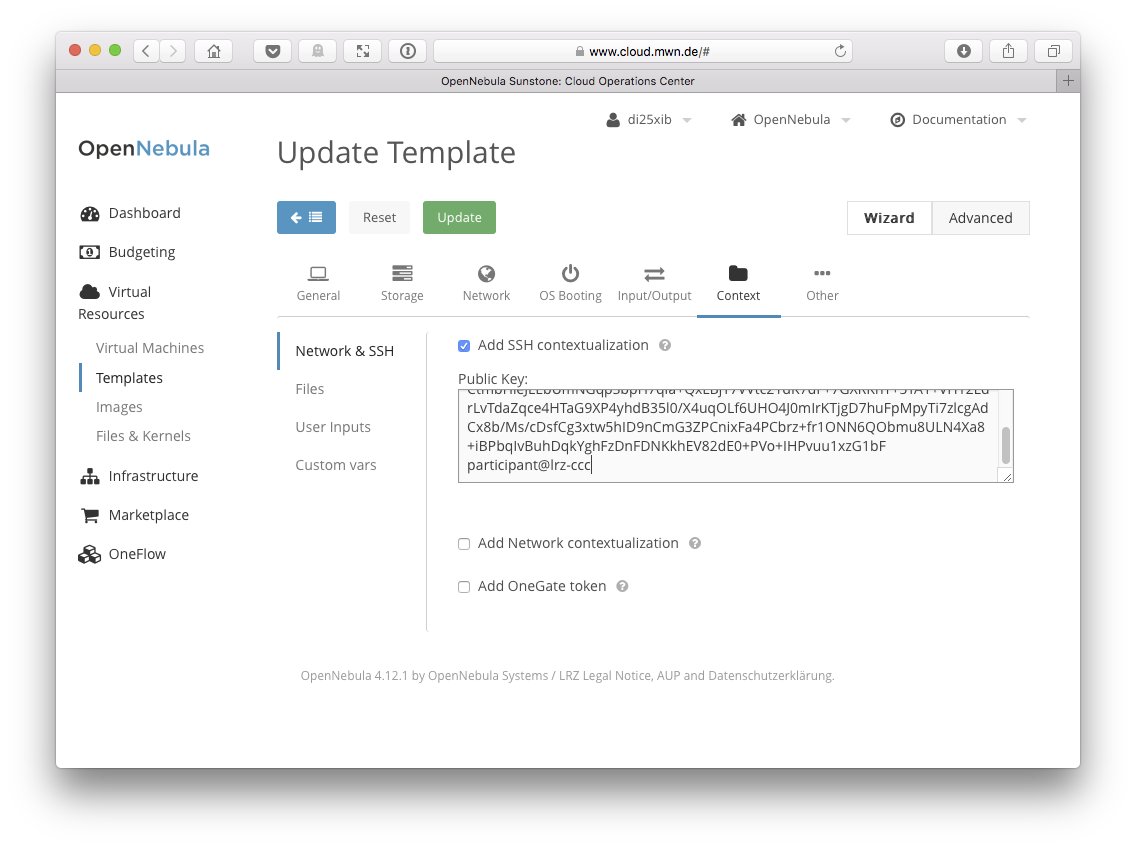
Click the
button in the top menu to save your changes and to return to the Templates overview page.
In this exercise you cloned an existing template and modified it to your needs: You added the NIC to an existing network to provide network connectivity and you added your personal public SSH key which will be used for authentication when you log into VMs that are created from this template.
Exercise 3: Create a new Virtual Machine
Creating a template is the first step to use the LRZ Compute Cloud. However, a VM template is a virtual disk which is used to create a virtual machine.
A virtual machine is a virtual computer that runs an operating system and allows to you log in, install software and get your work done. Virtual machines should be created when you need them and should be shut down when you do not need them anymore, because they consume resources in the Cloud which are then not available to other users.
As a rule of thumb you should treat a VM like a real computer at your home:
- Create/Start a VM when you need to work with it
- Undeploy/Stop a VM when you finished your work
In this hands-on lab you will learn how to create a VM from one of your templates. This hands-on lab uses a slightly different way as described in our online tutorial but the result is the same: You will have a running VM based on your template created in the exercise before.
- In the left-hand menu, go to Virtual Resources -> Virtual Machines
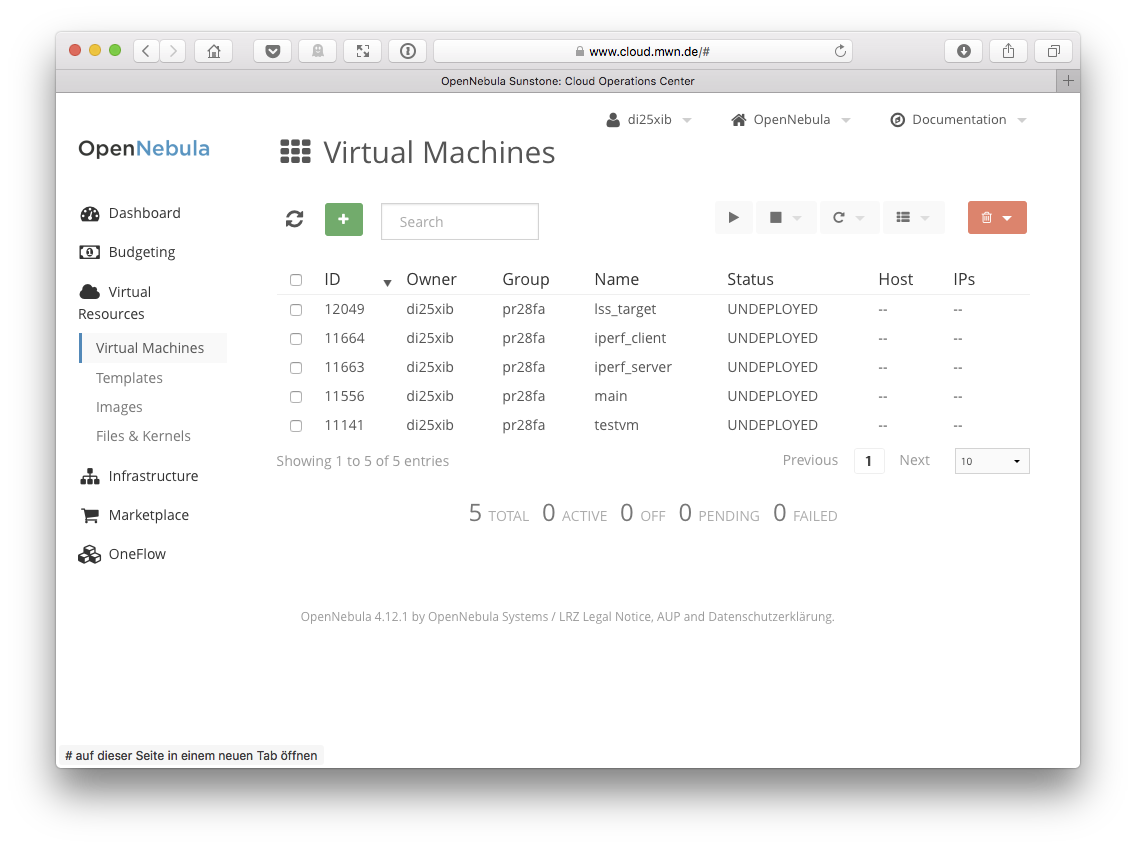
This menu item shows all your VMs. Once you created a VM it will show up here and you can start or stop it from here. - To create a new VM, click the
 button in the upper left corner of this window.
 - You will see a new form that allows you to specify some basic information for the new VM about to create. You can realize the little
 buttons next to the fields you are requested to fill out. If you want to get information about the particular fields you can move your mouse above these images to get additional information.
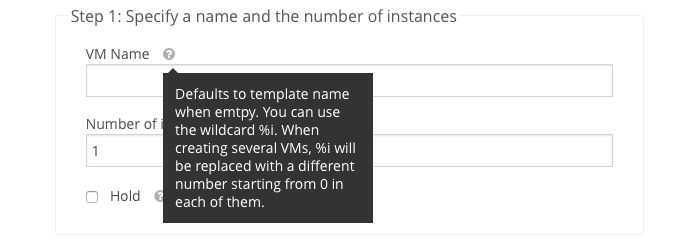
- Use
course-vmas VM Name. - Let the Hold checkbox unmarked.
- From the template list, choose the
course-templatetemplate with ID 1128 as template to create the new VM from.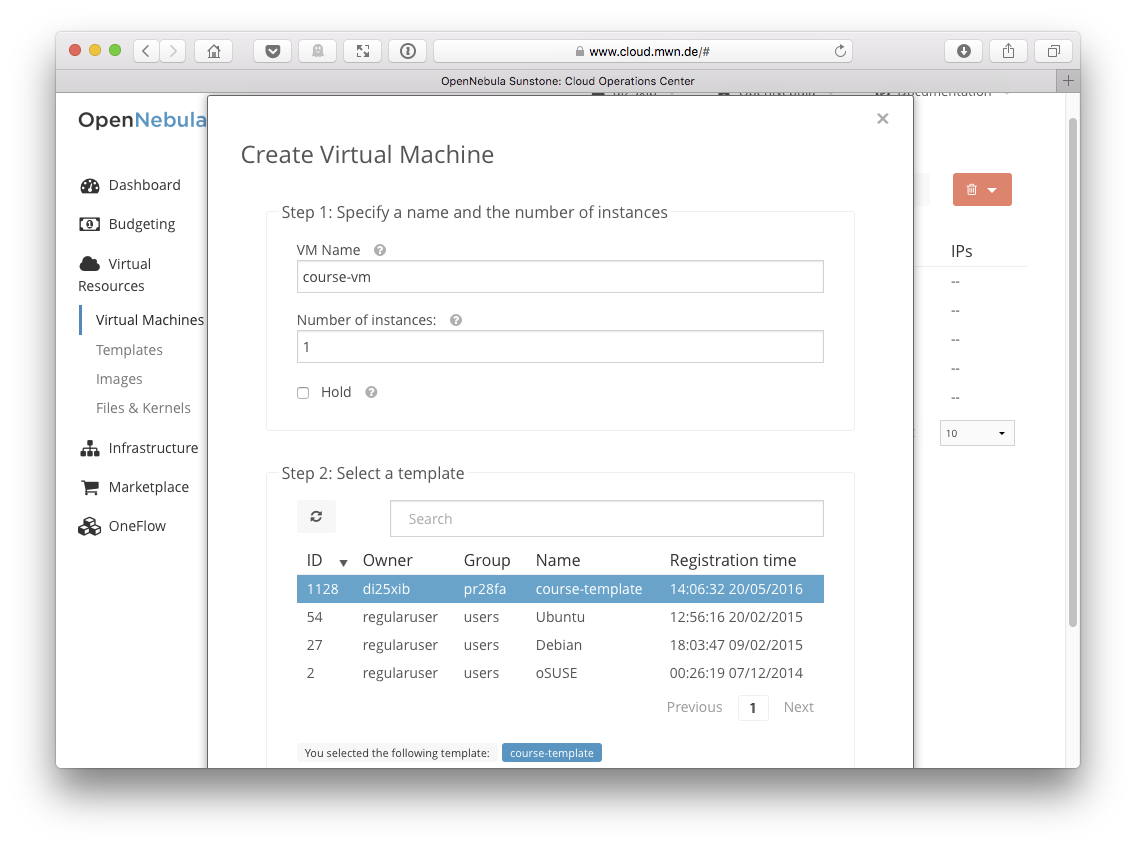
- Use
- If you cannot see the
 button scroll down and press it. The form will be closed and you will find yourself at the list of your VMs.
 - Shortly after you created your virtual machine it will show up in the list of VMs and will enter the boot process.
- The current state of your newly created VM is shown in this list. Shortly after you clicked the Create button, your new machine will be in PENDING state. Depending on the current workload of the Cloud it can take some time until your machine switches to RUNNING. You can use the
 button to update your list of VMs.
From this moment on you can log into your VM and start working. Once a VM is in RUNNING state and has one or more NICs the IP addresses are displayed assigned to these NICs.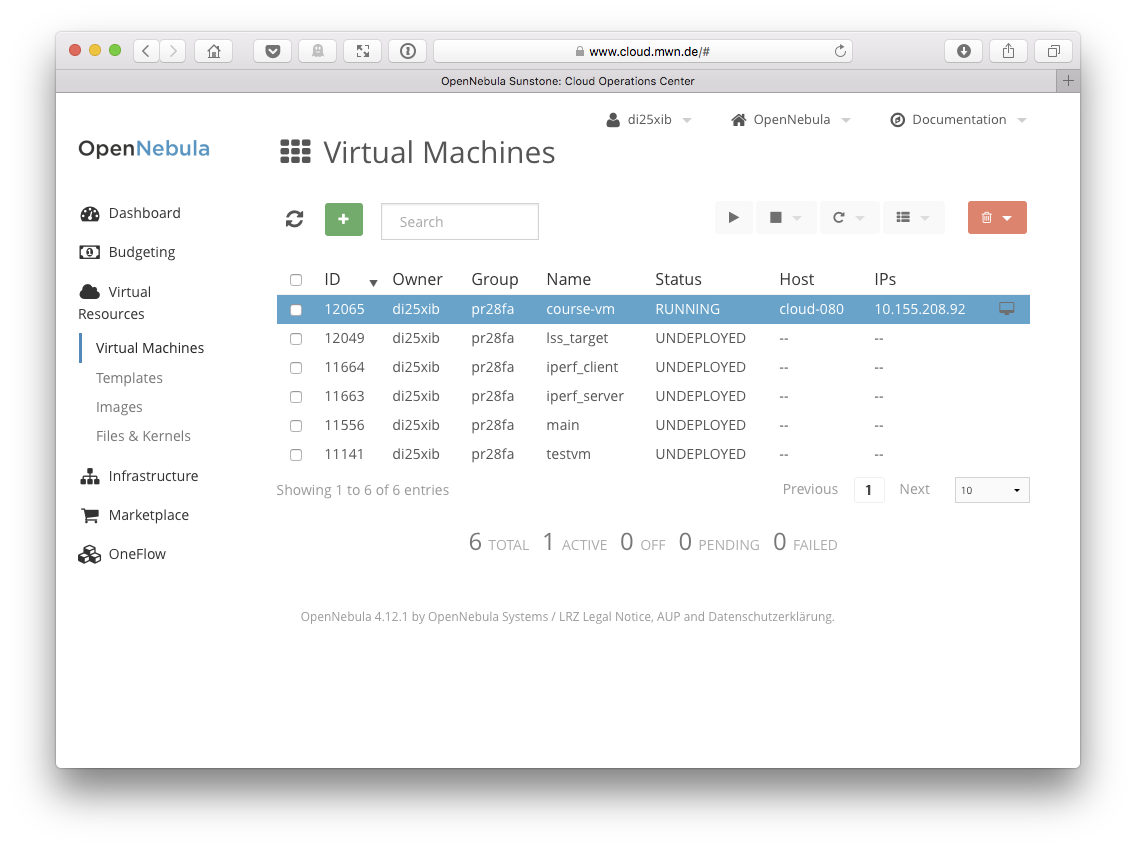
At this point you have created your first VM in this hands-on lab. Congratulations! ;-)
Exercise 4: Connect to a running VM using SSH and change the default password
Once you have a running VM in the Compute Cloud you can start your work. However, before doing anything regarding your research projects, you should immediately change the initial password of your privileged account (root) in the VM.
Why is changing the default password important?
When you created your VM, you used a template that was provided by the LRZ cloud team. Of course we know the password of the root account in the templates we provide, so we are basically able to log into all of your VMs created using one of our templates unless you change the password. This is not only true for images that we provide but is the case every time you use a VM image that has been prepared by any Third Party.
If you do not change the password, we will find out. Some time after a VM has booted we perform automatic security tests against the VM. We will also check if we could log into your VMs using the default password. Remember that you accepted our terms of use when you decided to use the cloud. In the section Security Considerations we informed you about security scanning:

If you do not change the password, you will receive an eMail from our security testing system that informs you about the finding.
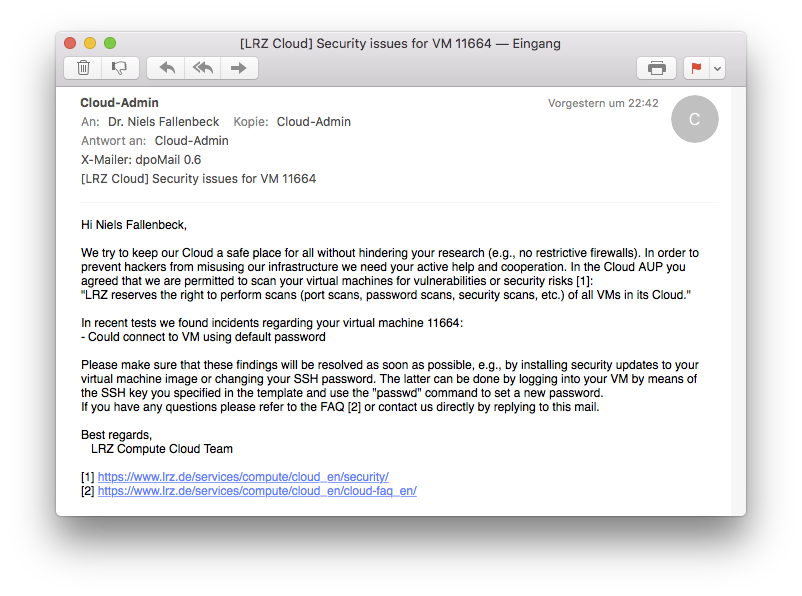
Receiving such an eMail is not dramatic. It is meant as an information for you, because you are responsible for the security of your VMs. If you forgot to change the default passwort please make sure that you change it when we remind you doing that.
That said, you should learn how to change the password by connecting to a running VM using SSH and performing a password update.
In this exercise you learn how to log in to your VM using SSH from a Linux/Unix machine. If you are running Windows, you can use PuTTY to connect to your VMs. You can create SSH key pairs using PuTTYgen. However, we do not cover PuTTY in this lab but we checked that it works. ;-)
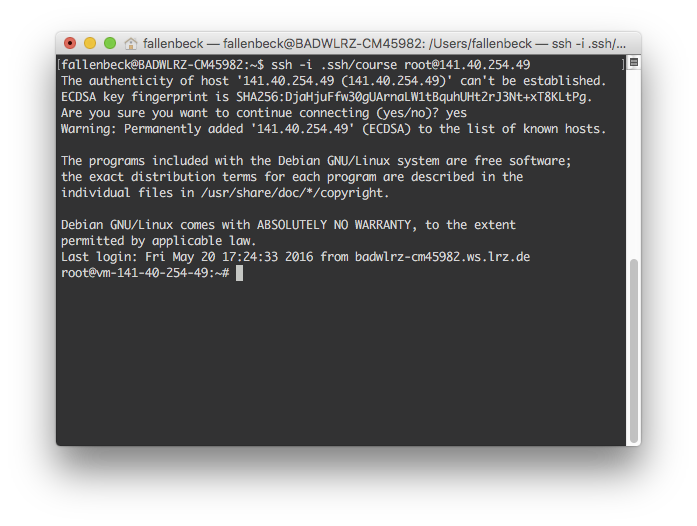
- Use SSH to connect to your virtual machine. The authentication will be done using your SSH key that you created in Exercise 2. Go to the Virtual Machines overview in the Cloud dashboard and find out the IP address assigned to your
course-vm. In your VirtualBox machine (or on your laptop) open a terminal and connect to the machine. You can also explicitly specify the private SSH key which should be used for authentication. In my case, my virtual machine has the IP 10.155.208.114 and I use the default SSH key. As username you must use
root. If you used the default key name, the command to connect to the VM is:ssh -i .ssh/id_rsa root@10.155.208.92In the following you will find screenshots using a key named
coursethat is used to log in to the VMs.If you connect the first time SSH will complain that it never saw the fingerprint of the host before and asks you if you want to really connect to the VM. Type
yesand press enter. If you presented the correct SSH key you should be immediately logged into your VM.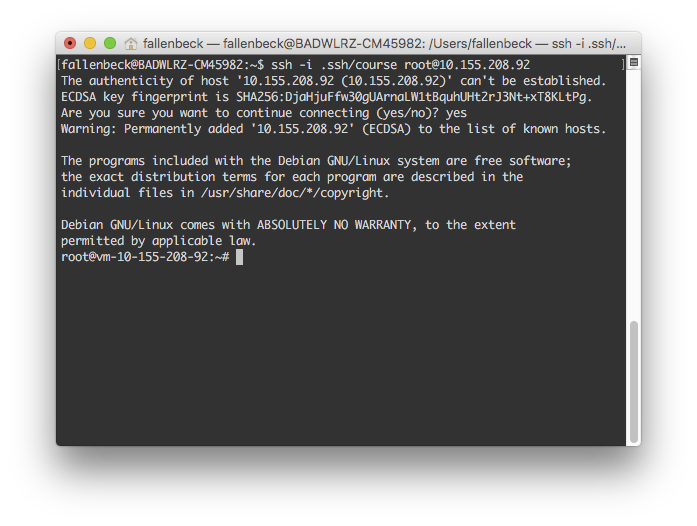
You are logged in as
root. This is the superuser of this machine and you can do everything you want. You can also destroy it by accident. To make sure that nobody can log into your VM asrootexcept you change the password of this user by using thepasswdcommand. Simply execute the command and specify your new password 2 times.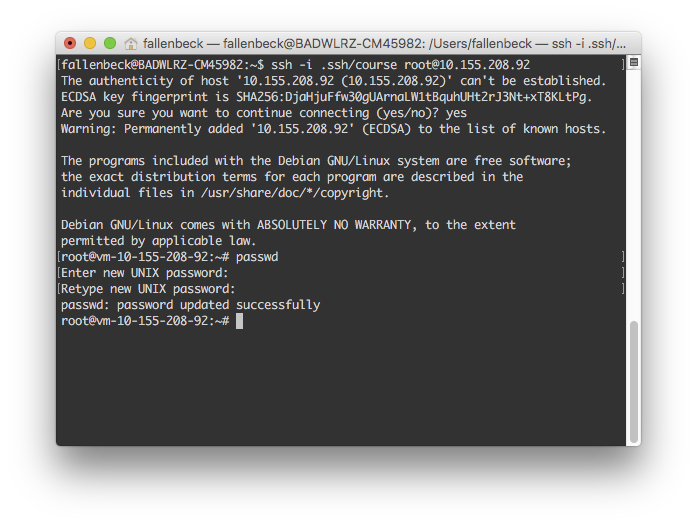
You changed the default password for user root in your virtual machine. Users now can only log in if they either know the password or are in possession of your private SSH key.
Exercise 5: Add another network card to the VM
By default (when using the template created in Exercise 2) a NIC is attached to your VM that is connected to the Munich Scientific Network (MWN), a private network connecting research institutions. IP addresses in the MWN are not reachable from the outside (the Internet) so you need to connect your virtual machine to another network that can be reached from anywhere in the world.
To add or remove a network card you do not need to shut down a running VM.
- Log in to the Cloud dashboard and go to the VMs overview page.
- To show the details of a VM, click on it.

On this page you can see some detailed information of your VM containing the ID, the name, the active state and so on. This section allows you to retrieve detailed information about your VM's configuration. You can also modify the VM's configuration. - On top of this page you can find a horizontal menu that allows you to display and adjust additional information.

- Click on Network to display information about the NICs attached to this VM.
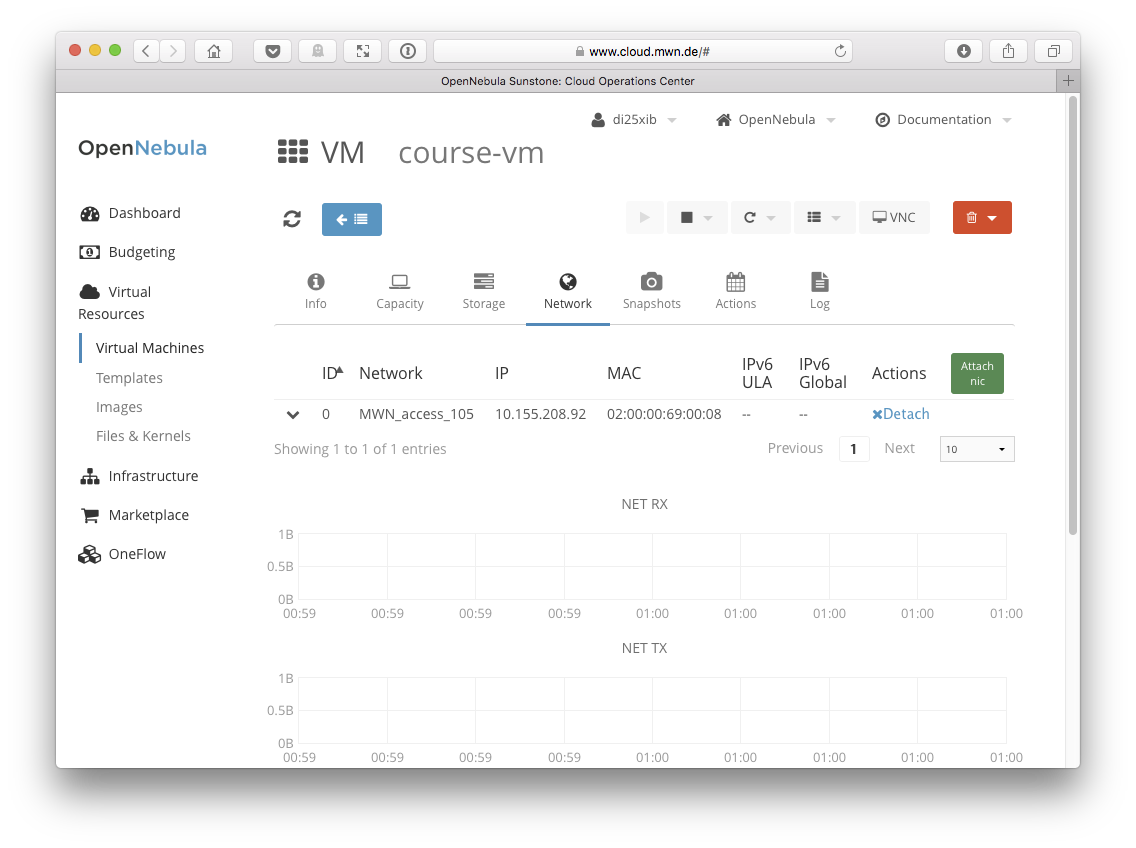
- You can see the information of the NIC already attached to your VM. You can also see that this card is connected to the network
MWN_access_105and has a (private) IP address starting with 10. Add another network card by pressing the button.
 - Another form opens that provides you with a list of networks to which the new NIC could be connected. From the list, choose the network
Internet_access_105(ID: 12) and click the button.
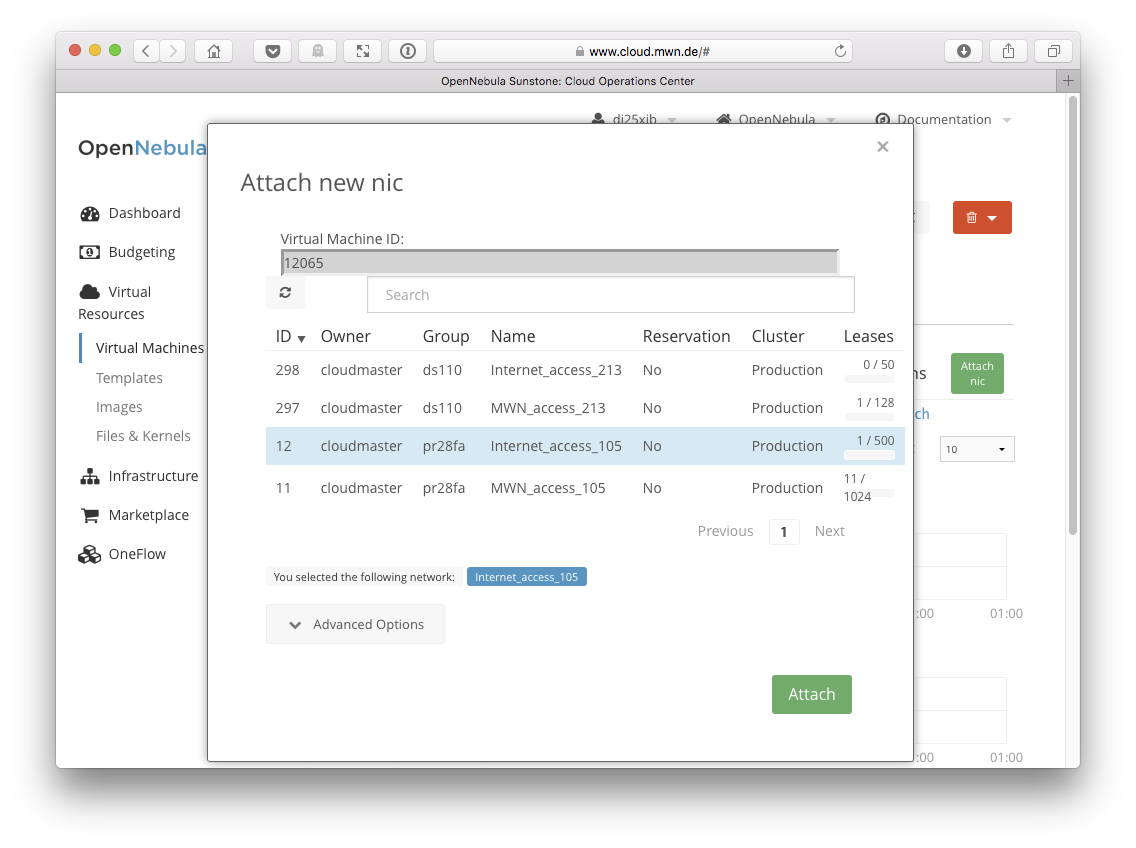
- You will find yourself in the Network details page and can see that the newly created NIC is about to be attached. To update the state of the operation you can use the button in the top left corner of the menu. Soon you should see that the NIC has been attached to your VM.
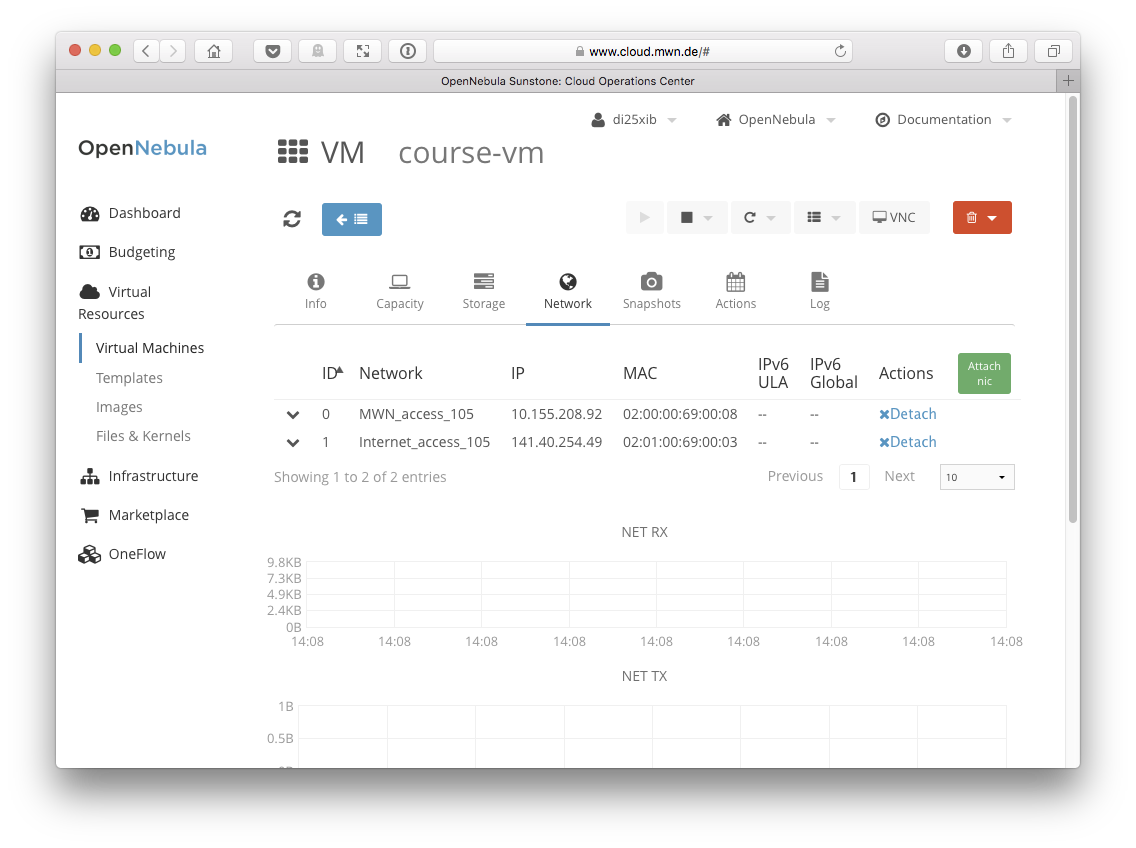
You can use the button to detach attached NICs from your VM.
 - From the list of attached NICs you can see the IP address that has been assigned to your VM. You will see that the IP assigned to the new network card looks differently from the IP obtained in the MWN network. Information about IPs attached to your VMs can also be found directly in the list of VMs. To go back to this overview list, press the
 from the top menu of this page.
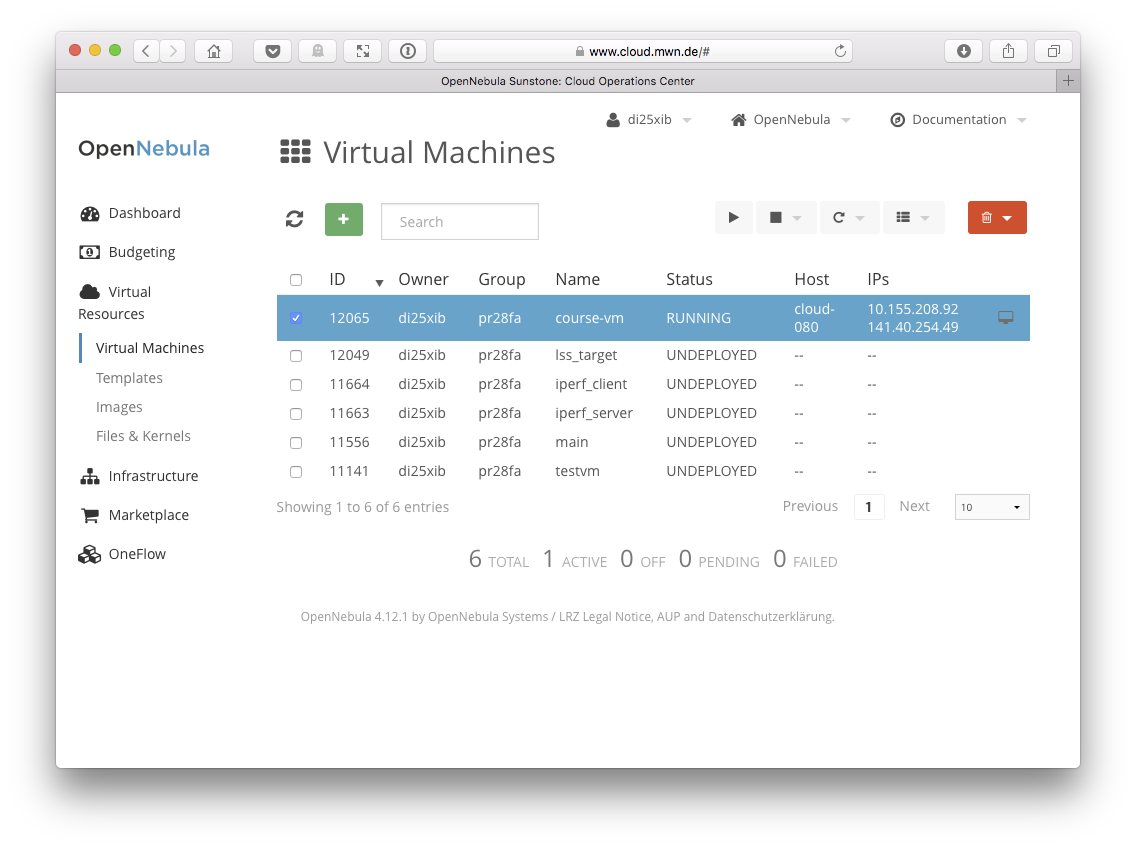
- To check if your VM is reachable from the outside, you can try to connect to the public IP of your VM. In this example we use a service displaying information about particular IPs to check if we can reach it. The IP assigned to the example VM is
141.40.254.49. You can visit this page and type in your individual IP address in the upper right corner to display information about this IP.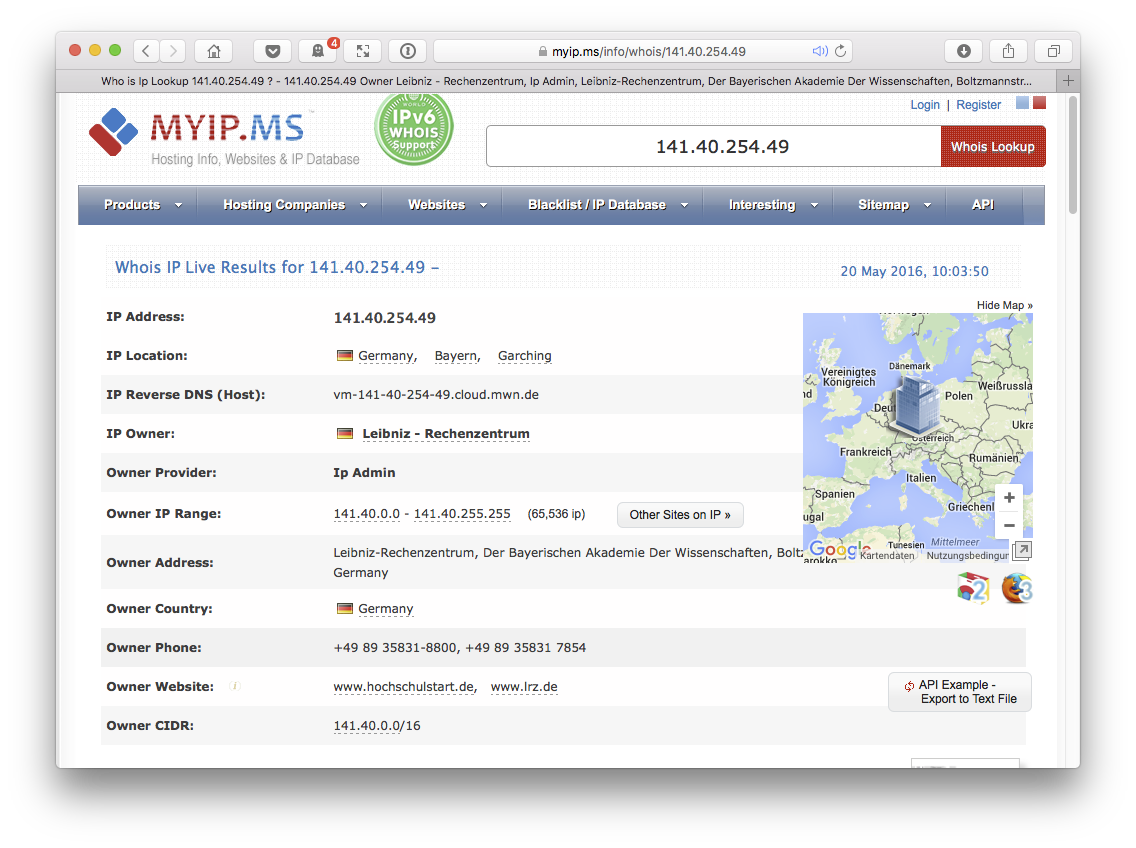
You can also see that your VM can be reached using a hostname which is bound to your IP address (looking somewhat likevm-141-40-254-49.cloud.mwn.de). Yours will be different but it should be in the same subnet (141.40.254.0/24) as the address in this exercise. - Despite of the fact that your IP address is known to the outside world, you may notice that you cannot connect to this IP address via SSH. In many cases it is not just enough to add another NIC to your virtual machine but you also need to set up networking inside your VM correctly to make use of the newly attached NIC. In the LRZ Cloud FAQ you can find a section covering the correct configuration of network interfaces.
Log in to your VM via SSH using the old IP address. - To configure the newly created network card to send out network packages, you need to add a gateway. Because of the fact that your VM has another network card with it's own gateway configurer, you must set a priority value to the gateways because the VM could not decide on it's own which gateway to use. This can be done by specifying the
metricof a gateway. On Debian-based systems you need to edit/etc/network/interfaces(information about other Linux distributions can be found in our FAQ). Open this file with your favorite editor (e.g.nano /etc/network/interfaces).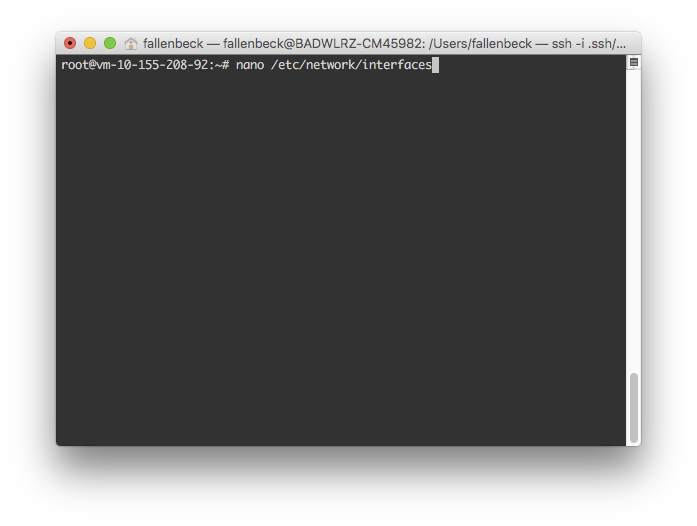
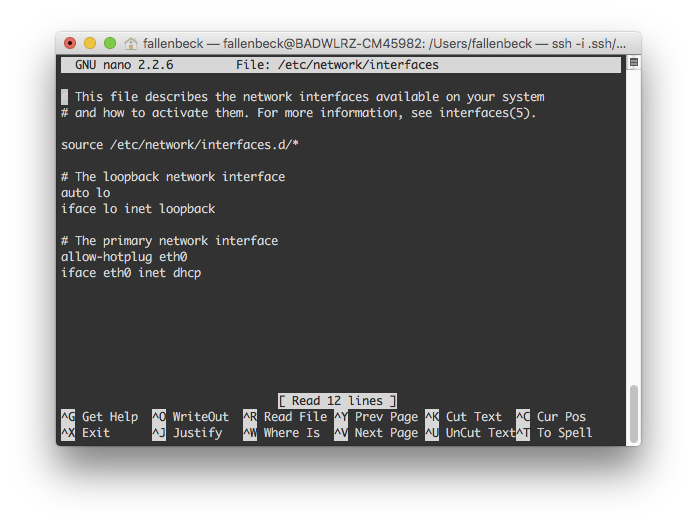
Add some lines to the end of the file specifying the
eth1interface and assign ametricvalue of 1 to the oldeth0interface. The higher the value ofmetricthe less the priority of the interface. If you do not assign a value explicitly, Linux will usemetric 0as default for an interface. add the following lines to the configuration file (and overwrite the existing lines regardingeth0):# The primary network interface allow-hotplug eth0 iface eth0 inet dhcp metric 1 # The world-wide reachable interface allow-hotplug eth1 iface eth1 inet dhcpAfter adding these lines, your file should look as follows.
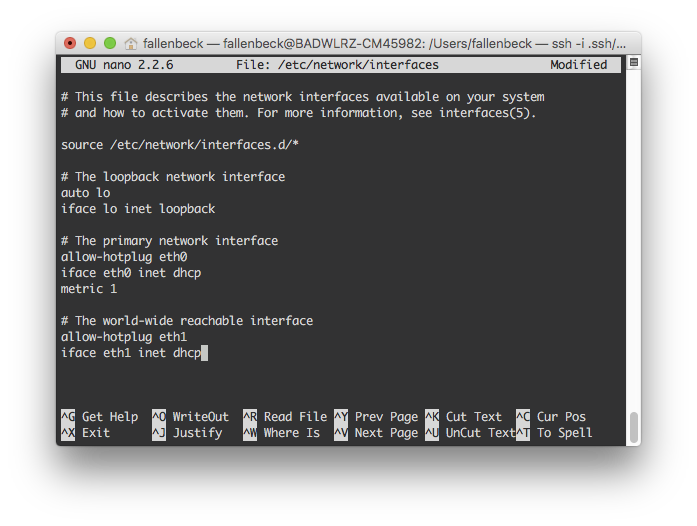
To exit nano, press<CTRL>-X,Y,<ENTER>.If you restart the networking inside the VM by typing
systemctl restart networkingand have a look at the routing table by typing
route -n, you will see that 2 gateways are available (2 lines with theGflag) which have a different metric.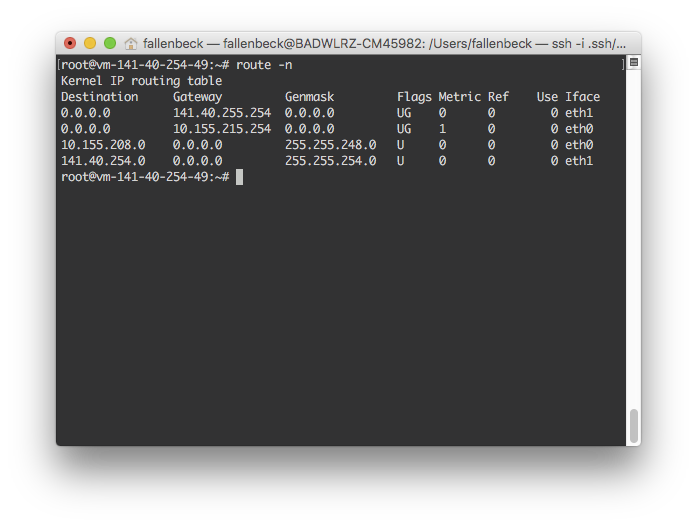
You can check if your network configuration works by logging into your VM using the public IP address.
In this exercise you learned how to attach an additional network card to a running VM. This is helpful if your VM needs to be reached from outsite the Munich Research Network.
Exercise 6: Install software in your virtual machine
In this exercise you will install software from the package repository of your Linux distribution which is Debian in our case. If you are using a Debian-based distribution such as Ubuntu packages can be installed the exactly same way. Other Linux distributions like SuSE or RedHat will come with their own package repositories, so commands will slightly differ.
First you need to update the index of your distribution's package manager. Debian's package system is called dpkg and one of it's interfaces is apt.1 This program is available via the command line and allows to search for software packages (using apt-cache) and installing or updating packages (using apt-get) and their dependencies. In the background it uses dpkg to install software.
In your virtual machine you first should update the package index to make sure that the package manager can access an up-to-date package database. To update the index, just type
apt-get updateto the command line.
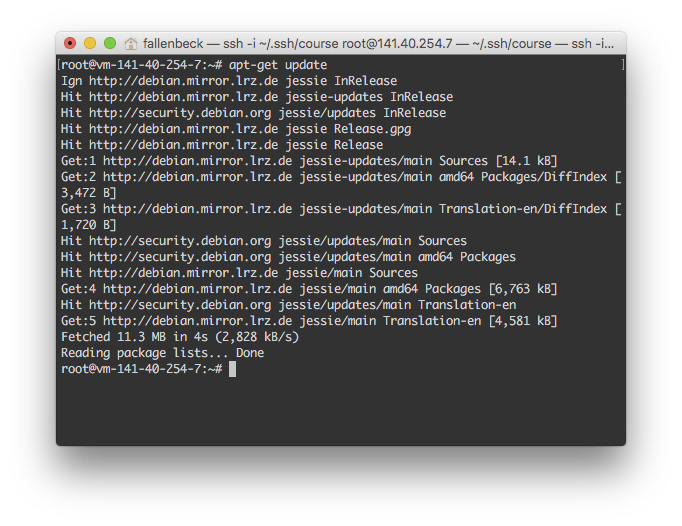
After a short while the updates are downloaded and installed.2Having updated the package index you are now be able to search for software in the package database and install the applications you are interested in. Let's assume that you want to install a small powerful web server you can simply search for it in the package repository. For looking up packages, you will use
apt-cache. Simply search for a small powerful web server by typing:apt-cache search small powerful web server
As you see, the first column of the output is the name of the installation package while the rest of each line provides a short description of the software.If you are more interested in a particular software package, i.e., you want to know the version number of the software to be installed, you can also use
apt-cacheto show additional information about the package. To display more information about the nginx web server, type:apt-cache show nginx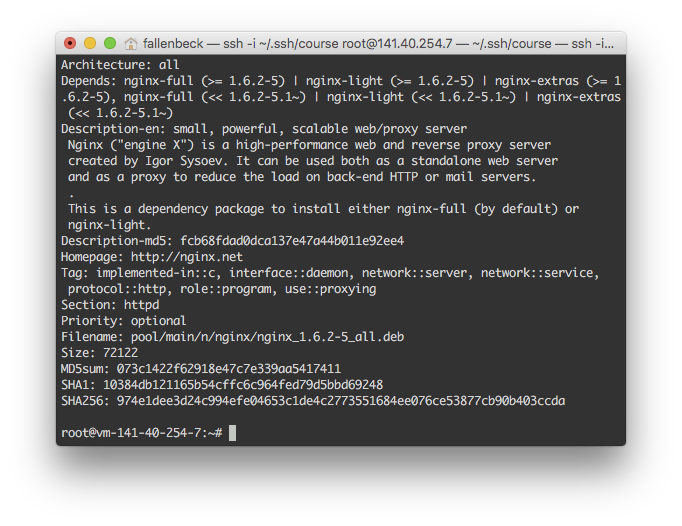
You can not only see a more detailed description of the package contents but you will also see the dependencies of the particular package and other information like the version of the software to be installed.If you already know the name of a software you want to install you can also look up the package name by using
apt-cachethe same way. As always you can pipe the output fromapt-cacheto other tools to simplify your life (and filter the output).
Let us assume that besides nginx you are also interested in a software called curl and you know that the name of the package to install starts with the name curl. You can search for all packages somehow related to the term curl and pipe the output to grep to display only lines starting with the string curl. Type:apt-cache search curl | grep ^curl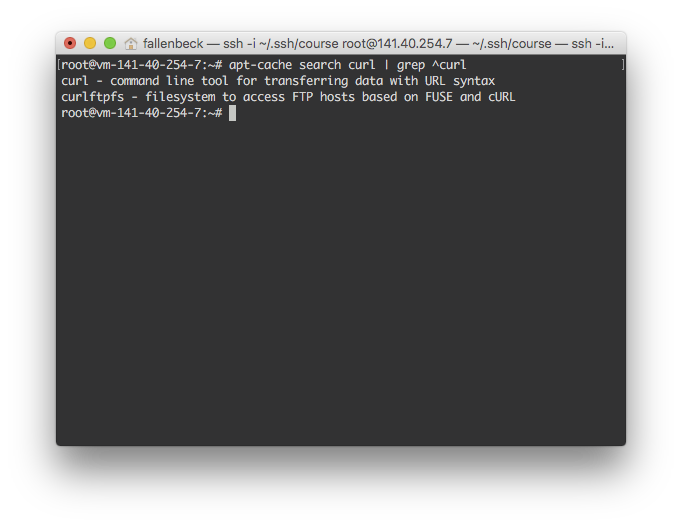
The nginx package provided by your distribution is well suited to your needs. You can simply install nginx together with curl (and even more packages if you have something in mind you want to use) by typing:
apt-get install nginx curl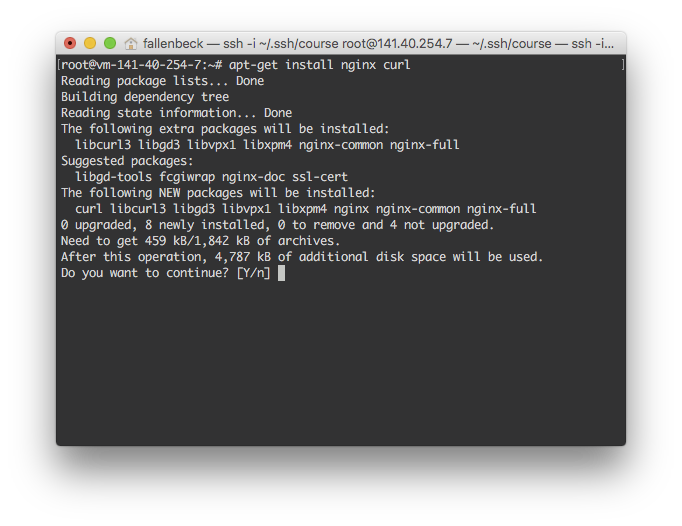
apt-getasks if you are sure to install nginx, curl and all dependencies needed for the software. After a short moment you can see that the installation has been successfully completed.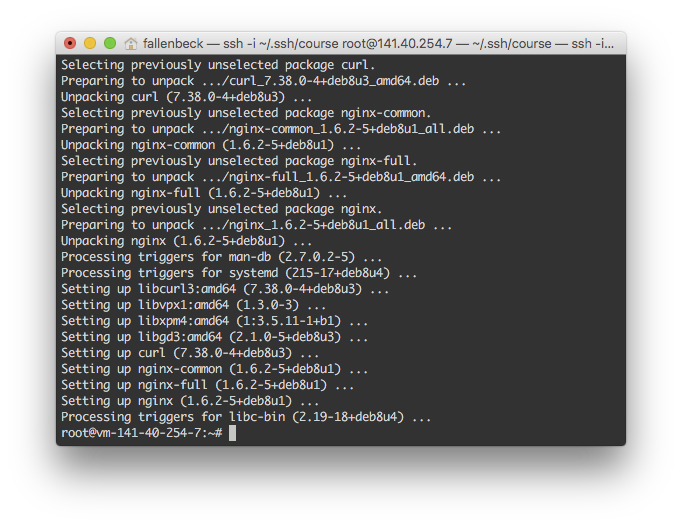
In this exercise you have learned how to install software from the package repository of your provider. This is the easiest way to get software. You should always update the package database before trying to search for or install software packages.
In some cases the software you need might not be available via the repository of your Linux distribution or the version you can get is simply too old. In this case you can download software to your machine and compile or install it by yourself.
Exercise 7: Shut down VMs
It sounds easy but it is an important step in using our Cloud offering: You are asked to shut down unused VMs to free resources for other users in need.
Whenever you do not need your VM anymore, you should undeploy it.
Before you shut down a VM you should make sure that you are not logged in via SSH anymore. If so, log out of the VM using the the
logoutcommand. Alternatively, you can press<CTRL>-D, a shortcut for that command. You can also simply close your terminal program to log out.logoutIf you do not log out from your virtual machine before shutting down it via Sunstone, your terminal connection will time out after a couple of minutes. This is not a problem but we'd like to show how to log out correctly.
Log in to the cloud dashboard and go to the VMs' overview page.
Select the VM(s) you want to undeploy and use the
 button in the upper menu to select the Undeploy option.
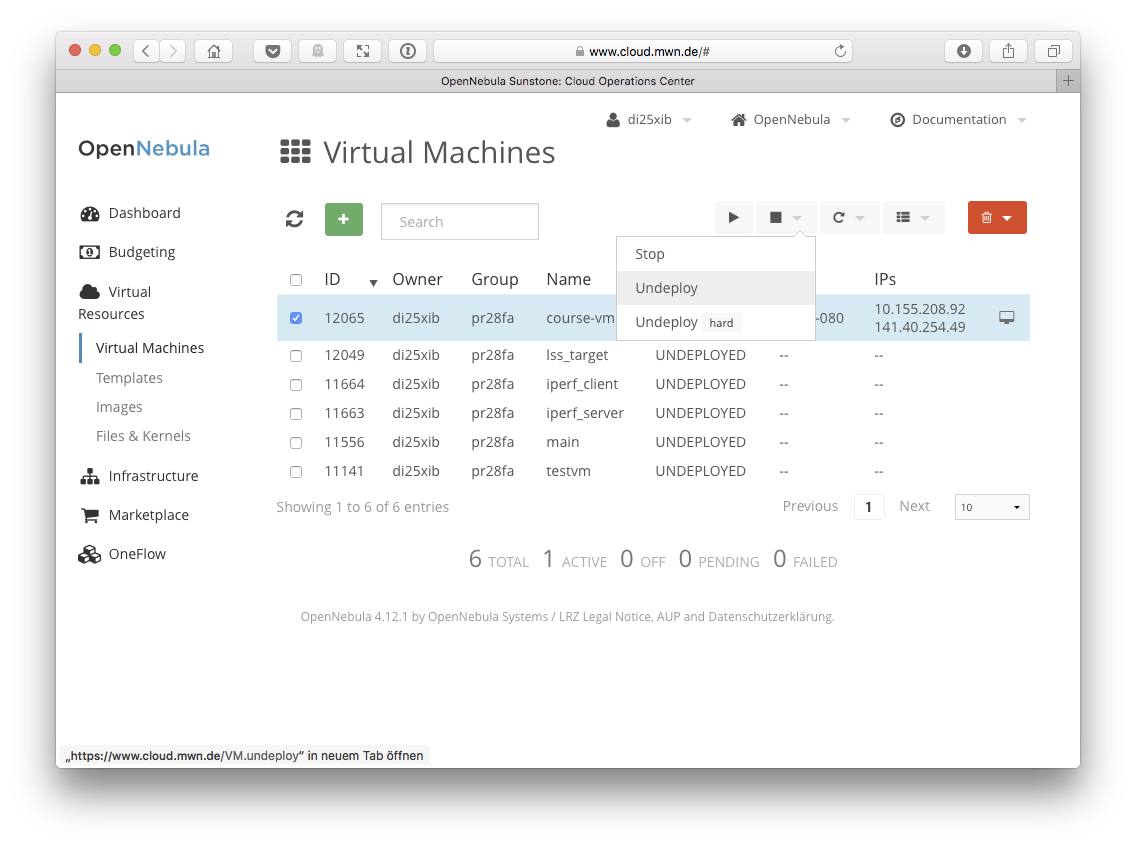
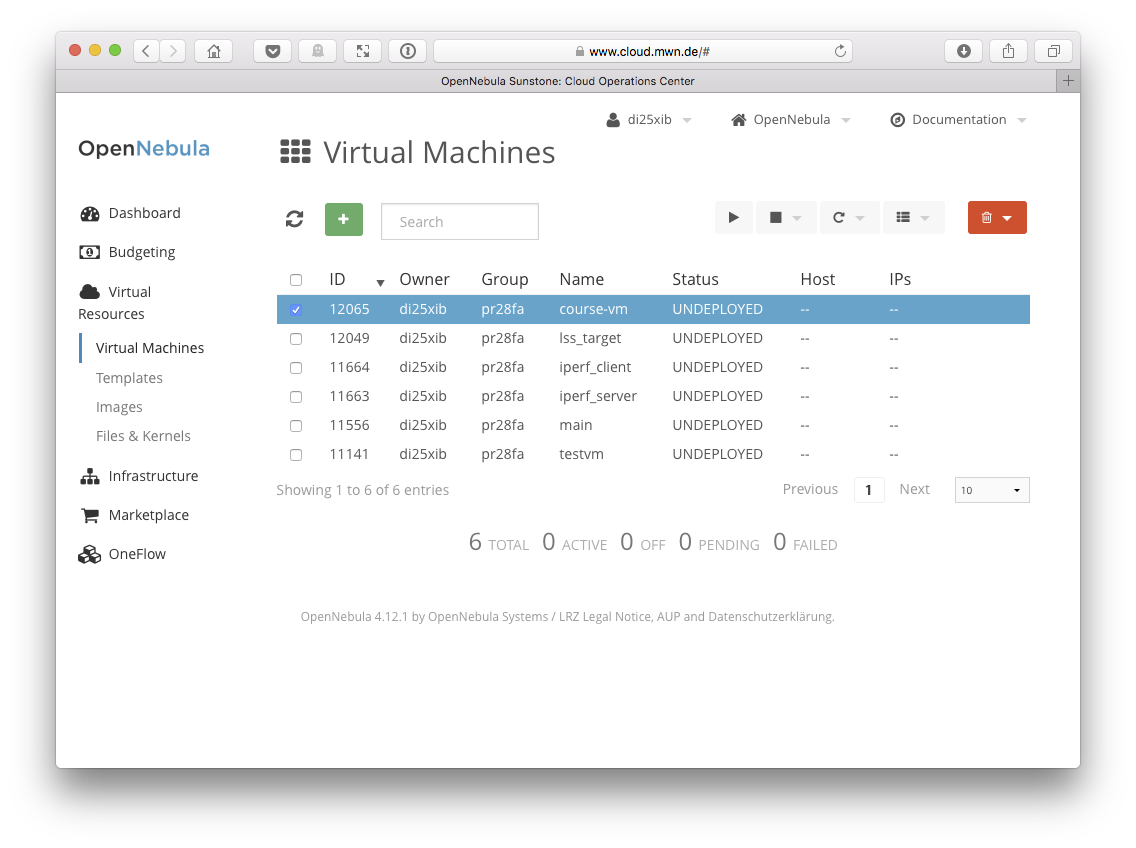
After a short while you can see that your VM has been undeployed. The physical resources used by this VM are now available for other users.
Shutting down already shutdown VMs
As you might know, you can simply shutdown your VM like your workstation using the halt or shutdown now commands on the command line.
In fact, this would shut down your VM but the Cloud would not recognize that automatically and would keep charging your budget and displaying the wrong state in the VM list.
If that happens to you, you should go to Sunstone and try to undeploy your (already shut down) VM. You will see that the state in Sunstone will change to POWEROFF.

If you try to undeploy it again, you will see an error like this:

You need to boot this VM again and once it has booted you need to undeploy it again. Then the VM should be in state UNDEPLOYED.
Summary
Congratulations for completing the exercises of this lab. You have learned how to:
- log in to the LRZ Compute Cloud Dashboard,
- create a VM template,
- create a new virtual machine based on that template,
- connect to a running VM and change the default password for
root, - add an additional network card to your VM to make it reachable from the internet,
- install software using the package repository,
- and shut down a VM.
Now you should have a good foundation to use the LRZ Compute Cloud offering. You are able to create VMs as needed, to install your own software and to start and stop VMs manually depending on your actual computational needs.
You have learned one way how to achieve particular goals. There are probably more ways of how to do things in our cloud. Futhermore, due to limited time in this lab the exercised walked you quickly to the processes of creating VMs and perform some operations on them. It is always a good idea to dive deeper into the topics you are interested in. In the next section you will find links to additional resources covering some of the topics in greater detail.
Links/Further Reading
- Frequently Asked Questions (FAQ)
- Security Considerations
- Tutorial: Creating a VM
- Tutorial: Data Transfer
- Tutorial: Installing a VM from CDROM
These materials are part of the LRZ Compute Cloud training course and are copyright by the Leibniz Supercomputing Centre. All rights reserved. Except where otherwise noted, these materials are licensed under the terms of the Apache License, Version 2.0. You may use it according to the license as is most appropriate for your project on a case-by-case basis. The terms of this license can be found in http://www.apache.org/licenses/LICENSE-2.0.
-
There is also a very popular interface called
aptitudewhich bases onapt. In contrast to the latter one,aptitutedoes also provide a (somewhat) graphical interface to the packages of your Linux distribution. ↩ -
The command
apt-getis also used to apply updates to your system.apt-get upgradeupdates all existing packages to the newest version provided by your distributor. ↩